Quick Ways to Relieve Back Tension Every Day!
Rush, rush, rush. Work, work, work. And what do we get for it all? A sore neck — tight shoulders — upper back pain! These are all results of increased muscle tension caused by the “fight or flight” response we all experience when we are under pressure.
But you don’t have to live with this type of discomfort day in and day out! Below you will find lots of information and several suggestions for changes that you can make TODAY to start relieving your back tension.
10. Know your body’s stress patterns!

Life in today’s world IS stressful! If it’s not COVID 19, it’s the job, the commute, the bills, the kids, the weather, or the relatives! When you feel under pressure or stressed, it “flips a switch” in your body — your autonomic nervous system triggers the “fight or flight” response.
One of the results of this response is that your muscles tense up in preparation for quick action. This gives you the greater strength and speed that you would need during a life-threatening emergency. Typically, you will adopt an “on alert” posture: your shoulders lift, pulling your arms forward, which creates muscle tension in the neck, back, and torso — you’re ready to act!
However, if you do NOT take physical action soon, the muscle tension remains. Often it lasts only a short time and dissipates on its own. But sometimes — especially when you are constantly or repeatedly in stressful situations — the tightness can be long-lasting and can impact the daily functioning of your body.
Any muscle under sustained tension for any reason eventually develops spasm and pain. This can manifest itself in different ways. The most common are: back and neck pain, tension headaches, tight or knotted muscles, and jaw pain or TMJ.

But EACH individual will experience this “fight or flight” readiness in different ways. You will feel back and neck muscle tension in different places and intensities. Some of you will hold stress in your hands, arms, or even your legs.
Know your OWN body’s stress patterns! Think about your body — after you’ve been through a stressful time, what hurts? (You may notice the pain a day or two after a crisis has occurred.) For example, I have one spot between my shoulder blades that is painful ONLY after I’ve been under pressure.
Try to identify a specific stress-related reaction in your body. Headache? Back pain? Neck pain? Tight leg or arm muscles? Once you figure it out, you’ll wonder why you never made the connection before!
Why bother? There are a couple of advantages to knowing your body’s stress patterns:
To be able to recognize the cause of your discomfort: So you won’t blame your last workout at the gym, an extra-long session on the computer or an afternoon of gardening or furniture moving. (Not that these won’t cause sore muscles, but it will not be the same!)
To develop strategies to release stress-induced muscle tension: There are a few simple things you can do to release muscle tension so that you will no longer be functioning in “fight or flight” mode.
- Take 10 to 20 slow deep breaths (lifting the belly, not just the chest), focusing on the exhale while relaxing the tight area of your body. Generally, when you are stressed, your breathing is shallow and rapid. Consciously slowing down your breath can “reset” the sympathetic nervous system response and allow your muscles to relax.
- While you are still breathing slowly and deeply, deliberately stretch and contract the area of tension. Don’t stretch to the point of pain, and don’t bounce. A slow, gentle stretch may be able to lengthen short, tight muscles.

- If slow stretching doesn’t seem to impact the tight muscle, try some reverse psychology on it! Tighten that muscle! Squeeze it as tightly as you can and hold it for at least ten seconds. Then release it completely and again, breathe slowly and deeply.
- Relax your jaw by dropping it down, allowing your mouth to open. Continue to breathe slowly and deeply, inhaling through your nose and exhaling through your mouth. You may not even realize you are tightening your jaw muscles until you consciously release them.


- If the area is accessible to you, gently but firmly massage the tight muscle. If not, see if you can find a tool to help you. There are many self-care massage tools, usually in a hook- or S-shape. (Maybe you can find something around the house that can reach your back!) Another trick is to use a tennis ball or (my personal favorite) a hard drier ball. The little points on the drier ball can penetrate into the connective tissue that may be stuck. Place the ball under your neck, shoulder, leg, or back and just rest on it for a minute or more, allowing those little points to sink in. Or perhaps someone nearby can massage the area for you. Even a massaging chair or seat cover can help relax your muscles.
- Take a hot bath or shower. Hot water enables muscle fibers to loosen and relax. Adding Epsom salts or essential oils to bathwater may also increase its benefit.
- If none of these techniques work well enough to remove your pain, you can always try an over-the-counter anti-inflammatory pain relief medicine like ibuprofen. Continue your breathing, stretching, and massaging while the medicine is working, and hopefully, your muscles will have relaxed by the time it wears off.

- When all else fails, call in a professional! If these relaxation techniques are inadequate to release stress-induced muscle tension, it may be time to seek out a skilled massage therapist or Rolf method practitioner. (See my website tab about the Rolf “method.”) You may have been living in “fight or flight” mode so often or for so long that the connective tissue in your body has adapted and is now supporting that posture permanently. A well-trained professional should be able to release those compensations in one or more sessions. Keep this in mind for when the quarantine is lifted!
TIP: Remember that strong, well-conditioned muscles can tolerate more tension than weak ones. So regular exercise, stretching, and good nutrition can help reduce muscle tension in the long run.
9. Sleep wisely and well!
Usually then we think about posture, we think about the way we hold our bodies while standing, sitting or lifting — not about how we’re sleeping! But we spend more time asleep — one third of our lives! — than in any other position! So CHOOSE your sleeping posture, don’t just let it happen! If you train yourself to sleep in an appropriate position, you’ll experience an improved night’s rest along with all the health advantages that go along with that!
Choosing the WRONG sleeping position:

- causes sleep deprivation
- results in shoulder pain, neck and back pain, and even chronic headaches
- compresses your lungs, making it difficult to breathe correctly
- puts pressure on joints and muscles, which can irritate nerves (resulting in pain, numbness, and tingling)
- damages the spine and its supportive structures

Choosing the RIGHT sleeping position:
- renews energy and replenishes cells, providing recovery from the normal stresses and strains of life
- enables deep breathing
- maintains the natural curves of the spine
NOT on your stomach!
Sleeping on your stomach places strain on the joints, muscles, and nerves of your back and neck. It also compresses your lungs, making it difficult to breathe deeply.
TIP: To help yourself break the habit of stomach sleeping, sew or tape something uncomfortable to the front of your sleepwear; then if you roll onto your front, you will experience discomfort and return to a better position.
But if you MUST:
- Let your feet hang over the end of the bed, so your toes are not pointed
- Put a pillow under one or both hips. This will reduce the curve in your lower back.
- Roll up your pillow and put it under your forehead, to keep your neck straight and your head facing down. (Keeping your head turned to one side all night puts tremendous strain on your spine and neck muscles.)
Side sleeping is better!
Many people sleep on their sides — and this IS a good option! Side sleeping can help prevent heartburn and acid reflux. But there are a few things to remember:

- Maintain a straight spine! Your neck should be straight, in alignment with your spine. Your back should also be straight, with your shoulders in line with your hips. Be sure that your top shoulder is above the shoulder you are lying on, and your top hip is above your lower hip. Don’t let your upper shoulder or hip lean forwards or back — that twists the spine and strains the discs. A pillow between your knees and another between your hands or elbows will help support your body alignment and keep your torso from drifting forward.
- Keep your chin level, don’t tip it down towards your chest or upwards.
- Bend your knees slightly, until your lower back is almost flat. (Not drawn up to your chest.)
- NEVER sleep with your arm under your head. This can put considerable strain on your shoulder joint and muscles.
- Bend your elbows slightly, don’t lock them.
- Change sides during the night to avoid damaging your organs.
- TIP: Placing a large pillow behind you might discourage rolling in the middle of the night, especially if you are trying to train yourself to sleep on your side.
Pillow talk:
The pillow under your head should be thick enough to support your head so that you neck stays in alignment with your spine.

If you lie on a too-thick pillow, your head will angle upwards, stretching the muscles and connective tissues on the lower side of your head.

And if you lie on a too-thin pillow, your head will bend downwards, stretching the muscles and tissues on the upper side of your neck. So, if you have broad shoulders, you may need two pillows; if you have narrow shoulders, a thin pillow will be enough.

Back sleeping is best!
Sleeping on your back is the easiest way to keep your head, neck and spine in alignment, while keeping their natural curves. When you lie flat with a pillow under your knees on a firm mattress, you are in a nearly perfect posture. A slightly bent knee reduces strain on the lower back.

It’s best to sleep with NO pillow or a very thin or contoured pillow under your head. The goal is to be comfortable while preserving the normal curve in your neck and keeping your head from flexing forward and causing muscle strain. You could also roll up a washcloth or use a small bolster pillow just under your neck.
However, back sleeping can make snoring and sleep apnea worse, so keep that in mind!
Added bonus: Sleeping on your back can help minimize wrinkles, since nothing is pressing on your face!
Tips for changing your sleeping posture:
- At first, practice your new posture for 10 minutes at a time; then try falling asleep in your new position.
- Return to your desired sleeping position if you move around during the night.
- Remember, pillows can help keep you from shifting — you may need them only in the beginning. TIP: Choose the firmest mattress that you can stand and still be comfortable. If a mattress is too soft, your hips will sink further into the bed than your head, creating strain in your lower back. Add a sheet of plywood under your mattress to try a firmer feel right away.
8. Loosen it up!
You already know that maintaining a seated position for an extended period of time will cause your body to adapt in order to maintain that position. What can you do to counteract this tendency? Loosen up those muscles and the surrounding connective tissue by gently stretching them back to their original length!

When you’re taking a short break from your desk or your recliner, do a few of these stretches to get your body back into shape.
Stretch it up: Standing with your feet shoulder-width apart, clasp your hands together and raise them above your head, palms up. Gently stretch from the middle of your back. Stretch as high as you can and hold it for 20 to 30 seconds — but keep breathing! Then stretch up a bit more and a little to the right — stretch high and hold. (Breathe!) Then stretch up and little to your left, and hold! The goal is to get as much space between the vertebrae as you possibly can! Release, letting your arms fall to your sides. Shake out your hands.

Stretch it down: Standing with your feet shoulder-width apart, bend forward from the waist slowly and gently, with your arms hanging toward the floor. Let the weight of your upper body (working with the force of gravity) gradually pull your head and shoulders toward the floor. Keep breathing! Continue this stretch for at least 30 seconds, stretching out your entire back and the back of your legs. Do NOT strain or bounce.
TIP: Be sure not to strain or bounce during any of these stretches. Overly vigorous stretching can actually cause injury. So just keep it slow, and lengthen those muscles gently!

Twist it: Standing with your feet shoulder-width apart, lift your arms to shoulder level with your elbows bent and your hands relaxed in front of your chest. Without moving your head or your feet, slowly twist from the waist as far as you can to the right. Then twist as far as you can to the left. Do this gently and rhythmically for at least 30 seconds, breathing normally and feeling the stretch in your upper back.

Stretch your shoulders: Standing up straight or sitting straight on a hard chair, raise your arms to shoulder level with your elbows bent and your hands relaxed in front of your chest. Stretch both elbows as far backwards as you can, opening your chest and pressing your shoulder blades together. Breathe deeply and continue the stretch for five seconds. Then cross your arms in front of you with your hands reaching towards your back. Exhale and continue the stretch for five seconds. Repeat five times.
Roll your shoulders: Standing up straight or sitting straight on a hard chair, let your arms hang loosely at your sides. Slowly stretch your shoulders up towards your ears and then as far back down as you can, pressing your shoulder blades together. Do this ten times, slowly. Then stretch your shoulders up and as far forward as you can, pulling your shoulder blades apart. Do this ten times, slowly. Remember to keep breathing!
These five exercises will relieve muscle tension in your back and can help “reboot” your posture. All together, they take less than five minutes! (But if you only have a one-minute break, just choose one or two!) Hopefully, you can find the time to do them all several times a day for your back’s sake! And don’t these slow stretches feel great? TIP: Remember to continue breathing slowly as you do these exercises. Don’t concentrate so hard that you forget to breathe!
Next time: “Sleep wisely and well!”
7. Make a change!
By now you know that long periods of sitting can have a huge impact on your life, and not only in muscle and disk degeneration! Too much unbroken time in a seated position is also associated with diabetes, cardiovascular disease, colon cancer, and death, even for those who exercise at other times of the day!
So what’s the solution? Last time I talked about “taking a break” from sitting. Today I am making recommendations for tiny lifestyle changes that will give you opportunities to move throughout the day.
Changes at work:
Park near the back of the parking lot or go out a less direct exit from your metro stop.

Drink from a small water cup. Then, as soon as it is empty, get up, walk around the room, and refill it.
Stand during meetings.
Take the scenic route to the bathroom or even use a restroom on another floor, taking the stairs, of course!
Try a height adjustable sit-stand desk.
Enable a reminder on your phone or computer; when it dings, get up! There is even free computer software that will dim the screen at set intervals to compel you to get out of your chair!
Move your trash basket away from your desk so you can walk your trash to it.

Choose a restaurant for lunch that is a bit further away.
If you brown bag your lunch and eat at your desk, take advantage of the time you saved by taking a walk around the floor or the block! (Not by checking Facebook or playing games on your phone!)
Changes at home:
Stand up during commercials (you’ve seen them too many times already) or between video game matches and do something productive! (Like take out the trash, rinse a few dishes, or move a load of laundry. See “Break it Up!” below for more suggestions.)
Keep a list of these little “during the commercials” tasks somewhere out of reach (on the coffee table, kitchen counter, or white board) so you’ll need to walk over to read it.
Move your phone out of reach, so if it rings or beeps you have to get UP to answer or check it.
Walk to the furthest bathroom instead of the closest one.
Next time:” Loosen it up!” (A few stretches to do during those little breaks.)
6. Break it up!
It IS difficult to maintain good posture over an extended period, particularly while sitting in one position, at the computer or in the recliner. This is because your ligaments and other soft tissues start to deform after about 20 minutes in the same position. Yes, your body will actually begin to become chair-shaped!
You can counteract this easily with a short break every 15 to 20 minutes. Get up and move around for at least 30 seconds a couple of minutes would be even better!
What should you do during this break?
Walk around your desk or your office or walk down the hall and back.
Walk to speak to a colleague a question in person instead of e-ma iling them.
Focus your eyes on a distant object (yes, even your eye muscles start to deform!)
Refill your water bottle.
Take a few deep breaths.
File some papers. Even if your filing cabinet is close, walk! Don’t roll your chair!
Read or straighten a notice on the bulletin board.
Put something away or return something to a co-worker.
 Water the plants.
Don’t bend over to pick up that pen you just dropped, take this as an opportunity to do a squat.
Take a stretch break. Reach as high as you can (toward the ceiling) and hold for 5 seconds; then bend over from the waist and hold for 5 seconds. (More on stretches in a few weeks! Watch for “Loosen it Up!”)
Stand up or pace when you’re on the phone.
Keep most of your desk supplies in a box on the other side of your office so you need to get up and walk across the room to get them.
Stretch your shoulders or bend over to touch your toes (more stretching suggestions coming next time in “Loosen it up!”). Anything that is not “chair-shaped” will help your body! And it may increase your mental alertness, too!
TIP: Set a timer to go off every 15 to 20 minutes, to be sure that you don’t sit too long.
Remember, the longer you hold a position, the more your body adapts to that position until it becomes your habitual posture!
Next time: “Make a Change!” about small things you can do to increase movement during your day.
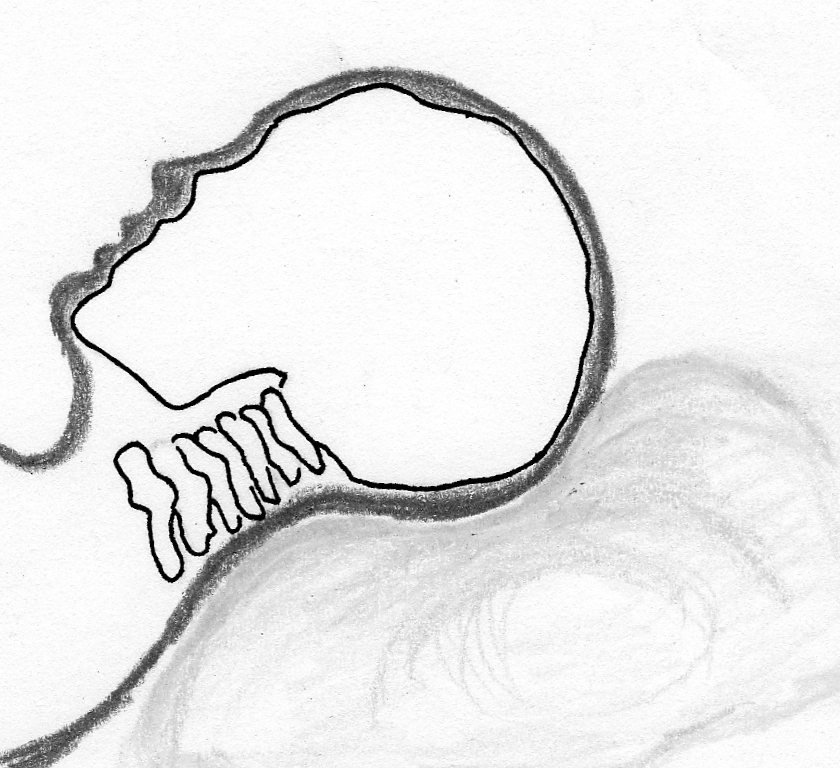
5. Don’t wreck your neck!
“Tech neck.” “Text neck.” “Facebook posture.” “Bad smartphone  posture.” It’s official. We’re spending 2 to 4 hours a day (or even more!) on our phones and other devices, and this is causing not only temporary muscle tension, headaches, neck, jaw and back pain, but actual injury to the cervical spine.
“Tech neck syndrome” is an overuse syndrome involving the head, neck, and shoulders. The official name is “Forward Head Position” (FHP) Your head, which weighs 10 to 12 pounds, is designed to balance on the top of your spine. Constantly tipping your head forward to text, type or read pulls it OUT of balance and strains the supporting muscles of your neck and upper back, and can cause your head to feel up to 49 pounds heavier (according to Dr. Kenneth Hansraj in “Surgical Technolo gy International”). This, in turn, shifts your center of gravity and your upper back hunches back to compensate. And then, to compensate for this upper body shift, the hips and pelvis tilt forward.
Are you wondering if you have this common syndrome? Do you have muscle tension in your neck, shoulders, or back? Do you experience stress or tension headaches? Do you have back, shoulder, neck, arm or wrist pain? Do you have any jaw problems? How about fatigue or low overall energy? Do you have a limited range of motion in your neck? These may seem bad enough, but Forward Head Position can lead to permanent damage to your cervical vertebrae or discs as well as irreversible arthritic degeneration!
Make a change! If you suspect that you have FHP, take action NOW! Don’t assume that if “it’s not too bad yet” you have nothing to worry about. Taking corrective action early enough can reverse the problem and prevent permanent damage.
Keep your head UP!
- Bring your device UP to eye level, and support your arm with the other hand, a table top, an armrest, etc.
- Or use a tablet holder, a pillow, or another tool to bring your device up.
- Keep your neck straight – don’t tilt your head – and use your eyes to look down.
Listen to your body!
- Hold your device properly: keep your wrists straight and don’t grip tightly.
- Pay attention to what your body is telling you. If you experience pain, immediately STOP using your device! Just put it down! When the pain is completely gone, your may pick it up again, but do it differently this time!
TIP: Exercise! Keeping your back strong and flexible will help you body better tolerate and recover from muscle tension.
Cut your time!
- Limit the amount of time you use a handheld device. If you have a lot of e-mails to answer or need to do some research, use your laptop or get a separate keyboard for your tablet. And be sure to use good keyboarding posture! (See Blog 4, “Make your workplace work for you!”)
- Take a break every 10 minutes at least. Put your phone down and move your head, arms, back and shoulders for a few minutes before picking it back up. A “winning” or “open” position is a great way to release muscles that have been hunched forward for too long! Throw your arms up, arch your back and stretch!
Restore your neck!
- Apply moist heat at the end of the day to reduce muscle spasms and decrease pain.
- Stretch your neck: You can do this multiple times each day – even
 at stoplights! Relax your shoulders and tilt your head to the right, allowing it to stretch for at least 10 seconds. You can add slight pressure by placing your right hand on the left side of your head and just adding a little weight – do not press down! Do
  this on both sides, at least three times. Then straighten your head, look ahead, and turn slowly to the right as far as you can, keeping your chin parallel to the ground. Try to look behind you. Do this on both sides, at least three times.
Invest in your neck!
Manufacturers are aware of the “tech neck” epidemic and are rapidly creating products that support good posture when using tablets, phones, and other devices.
You can buy glasses that reflect at 90 degrees, so you can keep your head up and read a device on your lap or the table in front of you. There are also covers, stands, neck straps, pillows and other tools that will raise your device to eye level. And you can even find bed stands, so you can read while lying on your back in bed! Consider investing in one of these tools to promote a healthy neck and decrease your likelihood of FHP.
TIP: IF changing your posture, stretching, and reducing the time you spend on your device are not enough to relieve your FHP, consider making an appointment with a chiropractor or a Rolf Method practitioner. (See my website tab about the Rolf “method” to learn more.) We may be able to reverse the damage done to your neck and spine!
4. Make your workplace work for you!
Certainly, many of us spend hours every day sitting in front of a computer, either for work OR play! And since the way you sit ha s a huge influence on how you stand and move (See Blog 2B, Sit up straight!), it’s important that you do everything you can to create a workspace that works FOR your body!
Look out for your legs! Long periods of sitting can result in restricted circulation in the legs (with problems ranging from swollen ankles and varicose veins to blood clots!) Sit so that your thighs are parallel to the floor or slightly inclined down (with your hips no higher than two inches above your knees) and your lower legs are perpendicular to the floor. Your feet should be flat on the floor. The chair seat should be LEVEL, not slanted to the front or back. Be careful that the front edge of your seat does not limit the blood supply to your legs. TIP: You can always use a little foot platform – or a box or an old dictionary – to lift up your feet and legs if your chair is too high.
Perfect pelvis: Poor sitting posture tightens back and hip muscles and weakened abs and glutes. This affects balance, stability, and stride. Don’t rock your pelvis forward into an anterior tilt or backwards into a sway back. Sit firmly on your sitz bones (the bony protuberances on the bottom of your pelvis) and balance the weight of your torso evenly on these two bones.
Better back: Extended periods of sitting can result in disk degeneration and permanent damage – ouch! Keep your back straight and your buttocks pressed into the back of the chair. Your chair should support your lower back and possibly your mid-back – don’t expect it to support your 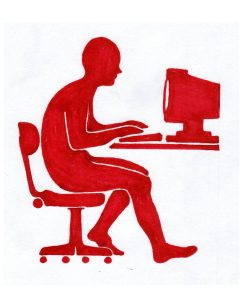 upper back! Your upper back should be straight, balanced on your pelvis, with your shoulders relaxed and back. When you bend forward, keep your back straight and bend from the hip. Maintaining this position is easy once you get the hang of it – with your pelvis supporting all the weight of your back, arms and head. TIP: If your chair does not have good lower back support, add a small, firm pillow or backrest. Appropriate support can significantly reduce back pain and fatigue!
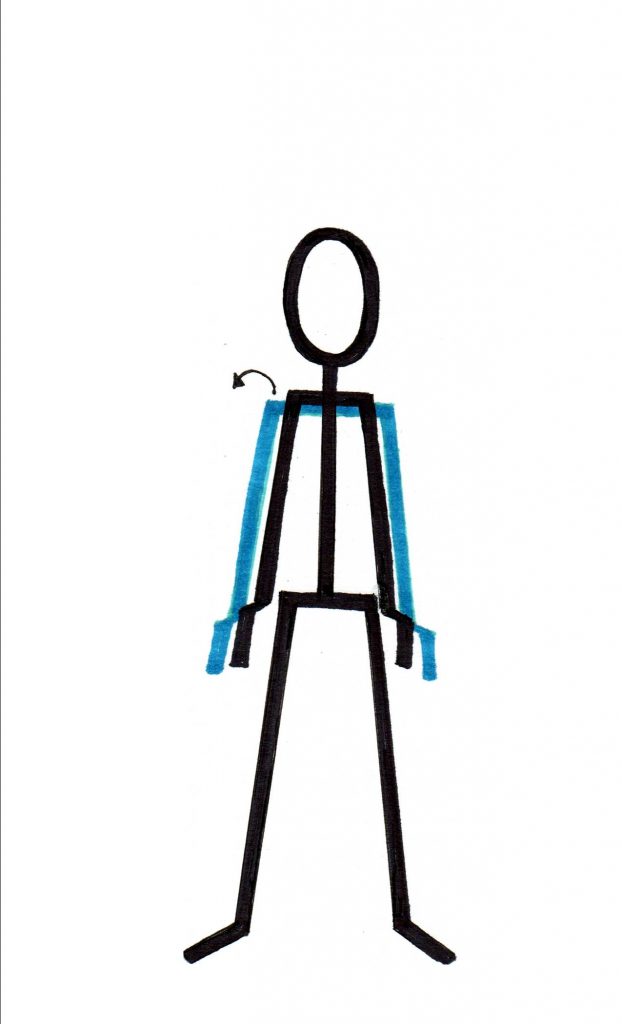
Adjust your arms: Lifting your arms UP overworks your shoulders and can cause upper back and neck pain. Your arms should hang loosely from your shoulders, with your elbows close to your sides and your forearms parallel to the floor and level with your wrists. Don’t use your whole arm from the shoulder to move the mouse – this can lead to “mouse syndrome” and other injuries! Your shoulder is not meant to do precise movements, but wide ones! TIP: Be sure your chair has adjustable arm rests so you can move them out of your way (or remove them) if they restrict your arm movements.
Watch out for your wrists! Of course, you want to avoid carpal tunnel syndrome! Ideally, when you type, your forearms and the back of your hands should be in almost a straight line from your elbow, just as it is when your arm is hanging at your side. Many keyboards have wrist supports designed to help keep your wrists in a neutral, nearly straight position. But wrist pads are there just for brief rests! Alternate between resting your wrists and lifting them up. And remember to rest the palm or heel of your hand on the support rather than your wrist. TIP: Sit close to your desk! It should be about 2 inches from your stomach. And be sure your keyboard is at a height that allows your elbows to bend at 90 degrees.
Help out your hands: Improper use of your mouse can cause repetitive stress injury, repetitive motion disorder, and cumulative trauma, not to mention carpal tunnel syndrome! Be sure your “mouse hand” is relaxed over the mouse with all your fingers extended (not bent under your hand). TIP: A trackball can also help prevent overuse injuries since you can use your thumb, fingers or palm. I LOVE mine!
No nonsense neck! Keep your neck straight above the rest of your spine. (This usually means you need to pull your head back!) Don’t stretch your neck forward. If you can’t see the screen clearly, move it closer – or get new glasses! It’s cheaper than the price of a new neck! TIP: A document holder can help you avoid awkward and repeated neck movement. Use your eyes, not your neck, whenever possible!
Heads up! Do not tilt your head up or down to see the screen – keep your chin level. Raise or lower your screen so you can look straight at it. (Or raise or lower your chair.) TIP: If you regularly work on a laptop, consider purchasing a separate keyboard and mouse for your best posture. This will enable you to adjust the height of the screen and the placement of the keyboard independently of each other.
Phone precautions: Cradling the telephone between your neck and shoulder causes severe muscle tension and can lead to chronic pain in the head, neck and shoulders. So if you use the phone regularly or for extended periods of time, do yourself a favor and buy a headset, a Bluetooth, or another hands-free option.
Try different arrangements of keyboard, screen, mouse and documents to find the system that suits your body best! And be sure to have enough light on your documents.
Next time: “Don’t wreck your neck!” about phone and tablet use.
3. Driving yourself crazy?
 Many of us here on the East Coast spend hours commuting to or traveling for work every day. Poor driving posture can result not only in increased back and neck strain, but also accelerated overall fatigue and increased reaction time. On the other hand, driving with good posture reduces strain on your spine and joints, prevents muscle fatigue and helps maintain alertness.
Here are a few guidelines for better driving posture that can help you arrive at your destination relaxed and alert:
- Sit with your spine straight and you lower back pressed into the set back to stabilize your pelvis. TIP: Extra lower back support (a rolled up towel or a small, firm pillow) at the back of the waist will help maintain your lumbar curve and keep your pelvis from tilting forward.
- Lower your steering wheel to the proper height, so you don’t have to lift your upper arms to reach it. Your hands should be a little lower than your shoulders.
- Lower your hands on the steering wheel. Due to new steering technology and the use of airbags, “10 and 2” is not longer recommended. Now traffic officials say that drivers should hold the wheel at a “9 and 3” position or lower. This allows your arms to hang naturally from your shoulders — vertically down the side of your body.
- Recline your seat back to a 10 to 15% angle to stabilize your upper body. TIP: Adjust your rearview mirror when you are sitting tall — then if you slouch or slide forward, you’ll notice it when you check your mirror!
- Move your seat slightly forward. Bent knees reduce hamstring tension. TIP: Don’t drive with your wallet in your back pocket — it can tilt your pelvis and spine to one side and exert pressure on the sciatic nerve.

- Adjust your head rest so your neck is in a straight line with your spine whenever you head is resting against it, keeping your chin level, not tilted up.
- Be sure your weight is evenly distributed on both of your buttocks and that you are sitting on your “sitz bones”. Don’t let yourself lean to the right side to rest your arm on an armrest or console that is NOT properly positioned. A firm seat cushion allows the body’s weight to rest squarely on the sitz bones, rather than on the tail bone! TIP: If your leather or vinyl seats cause your hips to continually slide forward, consider purchasing a fabric seat cushion for better friction.
- Relax your shoulders, lift your chest and drive carefully!
Next time: “Make your workplace work for you!”
2. Be aware of your posture! Part Two
As we talked about last time, correct posture is vital to your mental and physical wellbeing. Standing properly is very important, but if you spend more time surfing the web or watching TV than you do in motion, the way you sit has a greater influence on your posture than the way you stand does. Over time, the connective tissue in your body adapts to and supports your slouch, creating a new, unhealthy posture. And that’s not all! And that’s not all! Studies have shown that prolonged sitting is linked to organ damage (heart, pancreas and colon), muscle and bone degeneration, and even brain function. So when you know you’re going to be sitting for an extended period of time, keep the following tips in mind.
Sit up straight!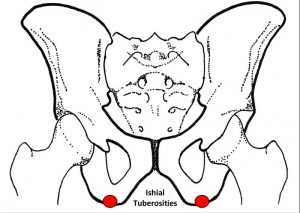
An important aspect of sitting properly is sitting on your “sitz bones.” These are your ishial tuberosities, the two bony protrusions on the bottom of your pelvis. These bones are meant to support the entire weight of your torso. The underside of your thighs and your tailbone are not!
Sit on a hard surface (hard enough so you can feel your bones against it) with your feet flat on the floor and your back straight. Slowly rock forward, backward, and perhaps from side to side until you can feel two bony spots in your buttocks. Balance the weight of your torso evenly on these two bones. Then straighten your spine so your shoulders are lined up with your hips. You may need to press your shoulders down and back, lifting your chest. Be sure your lower belly is not curving forward — press it towards your spine to straighten your lower back. Straighten your neck so it is aligned with your straight spine, and be sure your head is solidly on top of it and your ear is lined up with your shoulder.
Now try out this position: lean forward, backward, and sideways from the hip, keeping your back straight. This is how you should move in a seated position. Notice that you do not have to support your back in any way to maintain this position, if you are truly balanced above your sitz bones.
 Once you become accustomed to sitting on your sitz bones with a straight back, you will have more energy and more breath to work and play! It will soon become MORE comfortable to sit up straight than to slouch, I promise!
TIP: When trying to change your postural habits, put a sticky note on your computer or above the copy machine or counter to remind you to kick your old habits and straighten up!
Once you begin to stand and sit up straight, you will be engaging muscles that you are unaccustomed to using in this way. Assuming that you don’t have any soft tissue compensations (from old injuries, surgeries, repetitive movements or a lifetime of bad postural habits) your body will soon adjust, and it will become more and more natural to stand and sit up straight!
However, if your body is having difficulty adjusting to a balanced posture, you may need to lengthen your muscles with slow stretching, or strengthen your back, shoulders and core muscles with exercise. If the problem persists, you may need some deep tissue massage to relieve accumulated muscle tension, or connective tissue work to release fascial restrictions. To learn more about this, see my website tab about the Rolf “method”.
Next time: “Driving yourself crazy?”
2. Be aware of your posture! Part One
 Back tension can be caused simply by poor posture. No, you don’t have to start walking around with a book balanced on the top of your head! But teaching your body what good posture feels like and forming a few new habits can definitely help your back feel better!
Your body craves to be properly aligned — with the bones stacked one upon the other: your head resting directly on top of your straight spine, which sits directly over your pelvis, which balances on your straight legs and with your feet planted solidly on the ground.
The benefits of correct posture are that your body works more efficiently — breathing deeply, moving gracefully, and using less energy. And good posture actually impacts mental focus, as well as respiration, circulation, digestion and elimination. Not to mention that erect posture causes you to appear taller, slimmer, and more confident. On the other hand, poor posture causes tight muscles in the chest, head, neck, and shoulders, and can lead to chronic pain and degeneration of the spine.
Stand up straight!
Stand tall with your ankles, knees, hips and shoulders aligned. Often this means moving your shoulders back — this will also lift your chest. Your head should sit easily on top of your straight neck (not forward!) with your ear in line with your shoulder. Your chin should be level (parallel to the floor).
Be sure your weight is evenly balanced on your feet — both from front to back and from side to side, so that your weight is not forward (on the balls of your feet) or back (on your heels) or on the insides or outsides of your feet. (If you’re wearing high heels, just give up on this — your weight will not balance evenly!
Try to maintain this posture when you need to stand during the day — or at least return to it from time to time until it becomes a new habit.
Quick Posture Check
You still may not be sure what proper alignment should feel like, so do this quick posture check against a wall, an d then try it free-standing.
- Take off your shoes and stand with your weight balanced equally on both feet and your heels about an inch away from a blank wall.
- Lean back against the wall. Your shoulder blades should lie flat on the wall. If they don’t, press your shoulders down and back.
- Rest the back of your head against the wall, with your chin level (parallel to the ground, not tilting up or down) and your eyes looking straight ahead.
- Lengthen your neck, pressing the top of your head towards the ceiling without lifting your shoulders.
Stand against the wall for a full minute, letting the feeling of proper alignment sink into your body. Then, step forward and just stand still. Can you maintain that posture? If so, keep it up! See how long you can hold it! Don’t let habit draw you back into a slouch — concentrate and feel which muscles want to shorten. (This is a clue as to where your problem areas are!)
Next time: Be Aware of Your Posture — Part Two “Sit up straight!”
1. Straighten up every morning
Regardless of the position you sleep in, chances are good that when you wake up in the morning, you will have a “crick” (or two) in your neck or back. Doing a few stretches will release any of the muscle tension that was created overnight.
But the most important thing you can do for your back first thing in the morning is to straighten up your spine. Imagine that you have a cord that goes through each of the vertebra of you spine and out the top of your head. Now think of a tug on this cord that will straighten out your back and lift your chest. Be sure your shoulders are relaxed and pressed down. Just hold this “line” for 5 to 10 seconds and become familiar with the way this feels. If you can maintain this posture for a while and return to it from time to time during the day, you will be on your way to relieving your back tension!
TIP: Do you take a shower in the morning? Then take a minute to straighten up as the warm water is releasing muscle tension!
TIP: Set your shaving or make-up mirror high, so that if your back is not fully extended, your face won’t be centered in the mirror. Or put a piece of colored tape on your bathroom mirror so you can check your height as you straighten up each morning!
Come back next week for more ways to relieve back tension! Or, as always, check out my website to learn about the Rolf Method.